


Introduction ->
Web3 as a whole brings together the idea of storing (non-)critical information in a non-mutable public registry. This means that you can be sure that the information you store can not be erased or altered or that it is not a hostage to a particular infrastructure or company.
Now this idea brings a lot of things to be considered when building something on Web3. Different people have different needs, some people want to build games, some want to build financial applications and some want to build limited edition collections like NFTs and give proper ownership to certain individuals. All of these problems require different types of blockchain architecture, which different chains solve and sharing information between them at this point is a bit non-straightforward.
There exists a bunch of solutions that can help information between blockchains and one of them is Chainlinks CCIP (i.e. Cross Chain Interoperability Protocol). It utilises Chainlinks already present and battle-tested DON (Decentralised Oracle Network) architecture to make this information sharing more robust and secure.
Using Chainlinks CCIP, You can:
send tokens from one blockchain to another
send arbitrary messages
send messages and tokens altogether.
The only thing that you need to see is whether your source and destination blockchains both have CCIP support enabled or not which you can quickly check here:
https://docs.chain.link/ccip/supported-networks
Architecture ->
This is how the architecture of a message being transferred using CCIP looks like
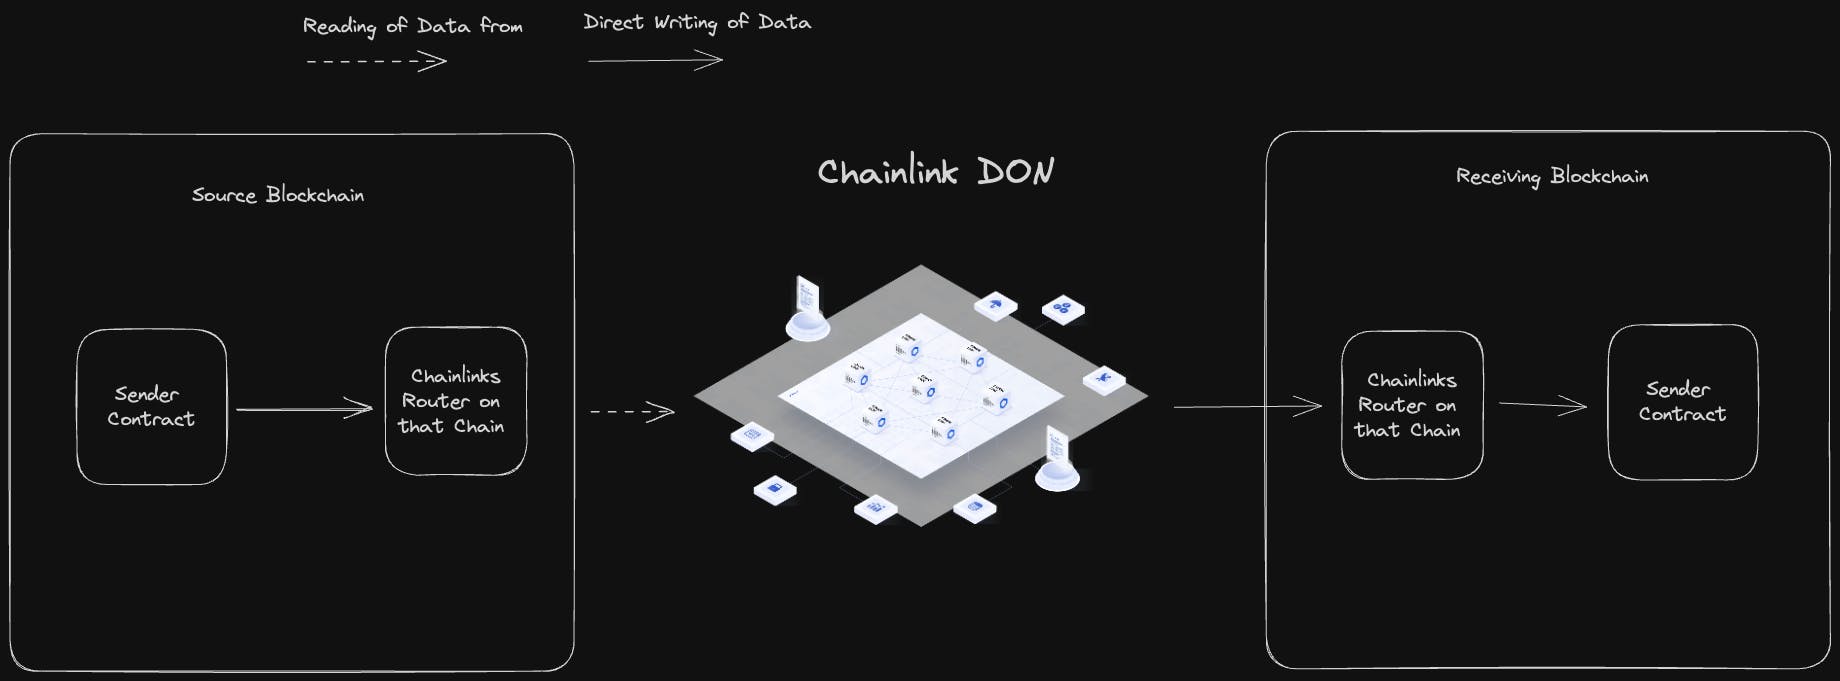
This is the simplest representation that I could come up with at the point of writing this blog on how I think the CCIP protocol works, It's much more complicated than this, but overall it should be somewhat like this.
Now that we have some basic understanding of how these things work we can start with utilising CCIP to send and receive messages across chains.
Smart Contracts ->
Let's start with seeing how Sender and Receiver Contracts are built.
The above is a sample Sender.sol to demonstrate cross-chain transfers we will deploy it on Sepolia testnet of Ethereum. You can use this link to open this contract in Remix directly and do the deployment using it.
The below example can be used to write a Receiver.sol smart contract.
We will deploy the Sender Contract on Ethereum Sepolia and the Receiver Contract on Polygon Mumbai.
Both of these contracts are copied from Chainlink's Official CCIP documentation and are only for representation purposes and should be used with caution anywhere other than just demonstrating CCIP and its use case.
Coding Demo ->
While you can deploy and test these smart contracts at your own will and choice of platform I went ahead and made it easy for you to test these on your local machine by creating a hardhat project, which deploys both contracts, sends messages from one and reads messages from another one.
It is present here at https://github.com/gat786/ccip.
The scripts and contracts are present in the scripts and contracts directories respectively in the above-mentioned repository.
To begin using the repository, clone it on your machine and start by installing the packages that are required to run it by running the following command
npm install
Once you have packages installed you can copy the .env_example file and create a .env by putting actual values of variables in their place.
Creating the Env file
# SENDER AND RECEIVER URLS are RPC Endpoints for
# sender and receiver chains
SENDER_URL=
RECEIVER_URL=
# Private key is the private key of account which you own
# and you wish to use to deploy the contracts and interact with them
# you need to have native tokens and LINK tokens on both chains
# at this address
PRIVATE_KEY=

# Sender Router Contract is Chainlinks Router Contract Address on
# Sender chain
SENDER_ROUTER_CONTRACT=
# Sender Link Contract is LINK Contract Address on
# Sender chain
SENDER_LINK_CONTRACT=
# Receiver Router Contract is Chainlinks Router Contract Address on
# Receiver chain
RECEIVER_ROUTER_CONTRACT=
# Each chain that is supported by Chainlinks CCIP has its own selector
# you need your destination chain address here
DESTINATION_CHAIN_SELECTOR=

# You can set these after deployment of Actual contracts
# you dont need to worry about it in beginning.
# Address of Sender contract you just deployed
SENDER_CONTRACT_ADDRESS=
# Address of Receiver contract you just deployed.
RECEIVER_CONTRACT_ADDRESS=
You can see that I have not mentioned Sepolia or Mumbai anywhere in the codebase and have made it so that you can pick and enter any chain information in the codebase and the demo would just work. So any point forward I want you to remember that whenever I say Sender chain I mean Sepolia and Receiver I mean Polygon Mumbai chain.
Make sure that the Private key that you are entering in the env is not shared with anyone and that you are not uploading to Github as part of your repository as it will be a major breach and will result in loss of funds.
Steps to follow
All of the necessary steps that you need to do are listed below in a gist
Deploy Sender Contract
Deploy Receiver Contract
Add LINK to both the contracts on their respective Chains
Send a message from the sender chain
Check the status on the CCIP explorer
Read the message on the receiver chain
Deploying Sender
Once you have the env variables set you can run the command
npx hardhat run scripts/deploy-sender.ts --network sender
and it will deploy the sender contract displaying a message like this

Deploying Receiver
npx hardhat run scripts/deploy-receiver.ts --network receiver
and it will deploy the receiver contract displaying a message like this

Once you have both sender and receiver contracts deployed you can add their addresses in the .env file and carry on with the next steps.
Sending a message
Let's start with sending our first message. While I already have a message written in the scripts/send-message.ts file you can edit it and change it to something else if you want to.

Once you have a message that you want to send you can run the following command to initiate a message send.
npx hardhat run scripts/send-message.ts --network sender
You will receive an output that includes the transaction hash which you can use to view its status on the CCIP Explorer and once it is completed we can move ahead and read the message from the receiver smart contract.

Tracking a message status
You can view the CCIP transaction status at https://ccip.chain.link
The output of command that sends a message should also give you a link through which you can directly view the transaction on CCIP Explorer.
Receiving a message
Once you see that it is finalised we can move further and read the message on the destination chain using this command ->
npx hardhat run scripts/receive-message.ts --network receiver
The output for it should look something like this

Conclusions
It took me about 20 minutes to send a message from Sepolia to Polygon let me know if you use it to send messages across any other chain on how much it took for you.
While doing all these steps make sure to correctly fill in the environment files or else these steps will not work and you will be left scratching your head
While this blog explains what CCIP is and how you can utilise it to send messages across chains I have a video coming soon that will describe the process in more detail and going through the codebase soon, so do watch out for it.
Thank you for reading it completely, see you soon!